The dot gain value in Photoshop is the compensation for something that happens when a page is actually printed on a commercial printing press. The resulting printed image turns out darker than intended. This is because an image is printed in dots and their diameter increases during the pre-press and printing process.
There are several factors that can effect this. Here are just a few:
- properties of the ink
- the shade of the substrate, usually paper
- the color of the ink being printed
Photoshop makes adjustments for this so that the file you output for the offset press will match what is shown on your computer screen.
How Photoshop and a printing press differ.
There is a difference between what Photoshop shows you on computer screen and the final printed product. On a computer monitor, there is extremely minimal dot gain. Photoshop knows this and presents to you on the screen the image as you have adjusted it. The screen can change colors by adjusting the brightness and intensity of a color. A printing press cannot do that. It prints dots and spreads them out to change brightness and prints limited colors (cyan, magenta, and yellow) to give shades of color. In doing so, the process causes what is referred to as dot gain. |
| Dots from a printing press create the illusion of a shade. |
How does dot gain occur?
I've covered how dot gain occurs in a previous article, but as it relates to Photoshop, let's explore this further. To understand this, we need to separate two types of dot gain - optical and physical. Photoshop will compensate for both of them.
Optical dot gain.
When light hits a paper, or any other printed surface, there is diffusion around the dots. The result is that less light gets reflected back to the viewer. Hence, the dots appear larger than they actually are. This is complicated by the fact that optical dot gain is different depending on the type of color that is being printed. Black of course, absorbs more light and allows less light around the edges of the dot to return to the viewer. Yellow of course allows more light. Additionally, the light being reflected inside the paper will have an effect on this. That is why Photoshop requires you to specify which type of paper you are using. Some papers print dots sharper than others, thus effecting the amount of light that will return to the viewer. Hence Photoshop will also ask if the paper being used is coated or uncoated.
When light hits a paper, or any other printed surface, there is diffusion around the dots. The result is that less light gets reflected back to the viewer. Hence, the dots appear larger than they actually are. This is complicated by the fact that optical dot gain is different depending on the type of color that is being printed. Black of course, absorbs more light and allows less light around the edges of the dot to return to the viewer. Yellow of course allows more light. Additionally, the light being reflected inside the paper will have an effect on this. That is why Photoshop requires you to specify which type of paper you are using. Some papers print dots sharper than others, thus effecting the amount of light that will return to the viewer. Hence Photoshop will also ask if the paper being used is coated or uncoated.
On the image below, notice how the light enters the paper on the left. Once on the paper, the light diffuses around the dot and into the paper, robbing more light from what is reflected back. The result is the image on the right which appears slightly larger and not as sharp.
 |
| Optical dot gain as light is diffused through the substrate and around the dot. |
Physical dot gain.
The nature of an offset printing press is that ink is transferred from an inked roller, to a printing plate to a rubber blanket and then to the paper. This requires pressure each time there is a transfer. After each transfer, the dot gets squished a little bit. This incrementally increases the physical diameter of the dot. Here is a more exhaustive list of factors that effect physical dot gain.
Further factors that effect the physical dot gain are the temperature of the ink, the pressure between the roller, plate and blanket, as well as the temperature of the rollers and paper. Additionally, the softer and more permeable the paper, the more squeeze is required to transfer the dot. Hence, Photoshop needs to know the type of paper that is being used.
 |
| Printing blanket and plate squeeze results in dot gain. |
Now picture this. It's really like taking an image to get photocopied. When doing so, you lose quality each time you make a copy. Lighter areas become lighter, and darker areas become darker. The same thing happens in the printing press. The image is squeezed from the ink roller to the plate, to the blanket, then to the paper. Each time a "copy" is made and the result is an image that looks like it's been photocopied a few times. But there is something that can be done about it.
Here is a brief video with a physical demonstration.
How Photoshop adjusts for dot gain.
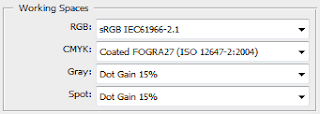
The beauty of Adobe Photoshop is that it will automatically make compensation for dot gain. This is done during the process of conversion from RGB to CMYK. Photoshop already has some profiles built into it that will enable this conversion. For example, some profiles include coated and uncoated paper. However the list is by no means exhaustive as there are many different custom paper profiles in the real world of offset printing. |
| Dot gain values can be entered into Photoshop in this window. |
It is noteworthy that programs like Adobe Illustrator do not compensate for do gain as it works with vector based graphics. Since images requiring shades of color are less common with this graphic type, the user can expect slightly darker images when printing.
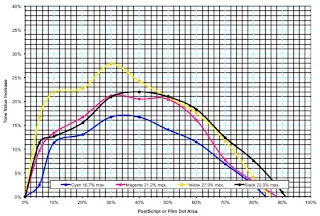
Prepress operators usually have their own dot gain profiles built into their plate printing machines. In other words, each printing press usually has it's own dot gain curve. This is carefully plotted by the printer and the whole dot gain process can be managed on the prepress side. There is usually a 2% tolerance in the dot gain profile. So it is normal to expect very minimal color variation from the digital file to the printed product.
Here is an example of a custom dot gain profile for a printing press.
 |
| Custom dot gain profile that can be imported to Photoshop. |
Entering your settings into Photoshop.
Knowing all of this will help you understand the settings you enter for conversions. In Photoshop, choose Edit > Color Settings. You can now enter your dot gain values obtained from your printing company. Typically, newspapers tend to be about 35%, magazines 25% and higher end glossy products are 22%. This number from your printer is usually taken from the 50% screen. But ask the graph above suggest, on press conditions can dictate higher dot gains in some areas.
These settings will ideally be obtained from your commercial printer and entered into Photoshop. Here is a tutorial of how this would happen.
Understanding shadows and highlights.
Shadows are the darkest details in an image. On a computer screen, you can see the slight difference from 99% dark and 100%. Not so with the image that comes from a printing press. Hence you must adjust for the detail in the shadows of an image. The problem is this: the ink usually bleeds into surrounding areas of the paper. A high amount of ink is required to print a darker image. Hence when reaching areas of 95% or higher darkness, the ink absorbs completely into the lighter areas of the paper and turns into a 100% shade. So for your shadow settings in Photoshop, you will want to have them set at 75% for newspapers, 90% for glossy magazines and brochures, and high end sheetfed work at 95%.
Highlights are another area where quality is lost. If the printing company is quality oriented, they will be printing a test strip that prints right alongside your image. This is trimmed off after the work is finished. It contains the shades of 1% to 5% and will determine how much detail in the screen range is still visible after being printed. At what point you lose detail is usually determined by the type of press and the paper being printed. On newsprint, you lose detail at about 5%. On higher end glossy magazines, you can get as low as 3%. Hence your minimum highlights settings should be the following - newspapers 5%, glossy magazines 3% and high end sheetfed printing at 3%.
 |
| The results of highlight loss. |
Understanding screen rulings.
Another variable in Photoshop is the screen ruling output of the printed image. This is similar to dpi on a computer screen, but not entirely the same. Quite simply, the finer the screen ruling, the more dot gain will occur. Sheetfed offset presses tend to get sharper dots and thus can handle higher screen rulings. Web offset printing presses have difficulty attaining higher screen rulings as the process is faster and less stable. Web printing also allows printing on both sides of the paper and so involves using two rubber blankets to squeeze the image onto the substrate simultaneously. Thus there is more squeeze, less stability and thus more dot gain.
Consult with the printer before outputting the file.
As mentioned, each printer, and yes, each printing press usually has a unique dot gain profile. Adobe Photoshop only contains standard profiles which are accurate, but not specific to the printing press you may be using. Consult with your local printer before outputting the file. Or provide the file to you printer and allow them to do the conversion. This will ultimately result in the best digital file reproduction on the offset printing press.
Comments
Post a Comment